
Surfshark ranks among the fastest VPNs available. The service delivers impressive download speeds and offers unlimited simultaneous connections. Plus, features like universal split tunneling and customizable multi-hop endpoints make it a solid choice for most users.
But maybe the apps hang up too often. Or perhaps features keep turning on without your permission. Whatever the reason, switching VPN providers shouldn’t feel complicated.
Let’s walk through every cancellation method so you can exit cleanly and move on.
Stop Auto-Renewal Through the Website
Canceling Surfshark doesn’t end your service immediately. Instead, you stop future charges while keeping access through your current billing period. That’s actually pretty fair.
Here’s the process for subscriptions bought directly through Surfshark:
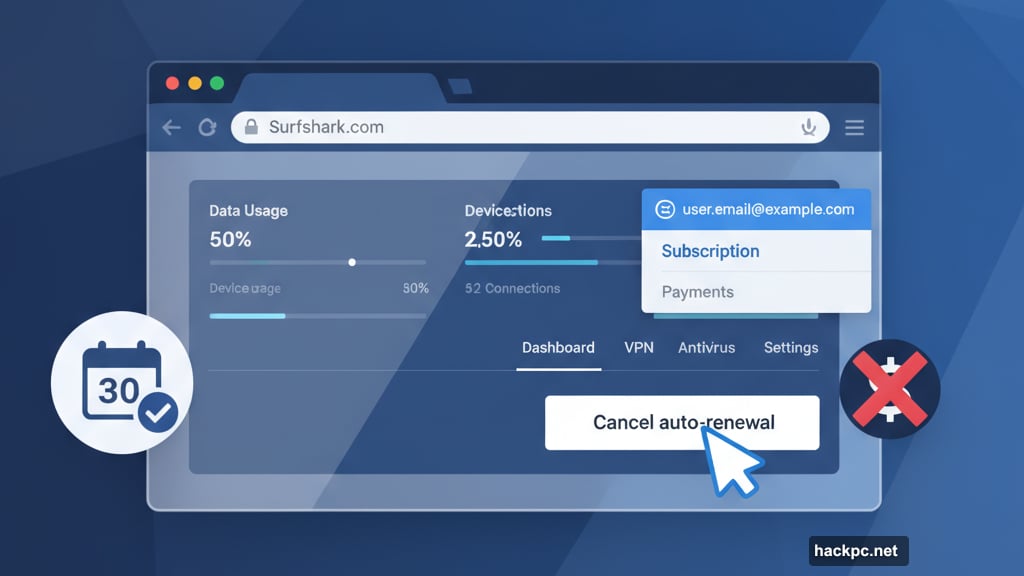
Head to Surfshark.com and click “My account” at the top-right corner. Log in with your credentials. You’ll land on your account dashboard.
Click your email address in the top-right corner. Select “Subscription” from the dropdown menu that appears. Then click the “Payments” tab beneath your subscription details.
Scroll down until you see “Subscription details.” Next to your active Surfshark plan, click “Cancel auto-renewal.” Done.
One important catch though. Refunds only work within 30 days of your original purchase date. After that window closes, you’re stuck paying for the rest of your current term. Surfshark doesn’t prorate unused time either.
You can also cancel through live chat by simply asking. However, expect multiple attempts to change your mind before they process the request.
Canceling Through App Stores Works Differently
Bought Surfshark through Google Play or the Apple App Store? The cancellation process changes completely. You’ll need to manage the subscription through whichever platform charged your card.
For Google Play Store purchases, open play.google.com on your computer. Click the circle containing your account’s first initial at the top-right. Then select “Payments & subscriptions” from the menu.
Navigate to the “Subscriptions” tab and scroll until you find Surfshark. Click “Manage,” then “Cancel Subscription” and follow the remaining prompts.
Apple users should open the App Store on macOS instead. Click “Sign In” at the bottom-left and enter your Apple ID credentials. After logging in, click your name, then “Account Settings” at the top-right.
Select “Subscriptions,” locate Surfshark in the list, and click “Edit” followed by “Cancel Subscription.” The desktop method works more reliably than trying through mobile apps.
Amazon Subscriptions Need Special Handling
Amazon lets you buy Surfshark directly, which means you’ll also cancel through Amazon. The process is straightforward but easy to overlook if you forget where you originally subscribed.
Log into your Amazon account. Click “Account & Lists” at the top-right, then navigate to “Membership & Subscriptions.” Scroll through your active subscriptions until you spot Surfshark.
Click “Cancel Subscription” and follow the onscreen instructions. That’s it.
Deleting Your Account Requires Live Chat
Want to completely erase your Surfshark account instead of just canceling? There’s no direct button for that. You’ll need to contact support through live chat.
Go to support.surfshark.com and scroll to the bottom. Click “Chat with us” to open a conversation window. Tell the bot you want to delete your account entirely.
Be prepared for pushback. Support representatives will likely ask you to reconsider multiple times before processing your deletion request. Stay firm if you’re certain about leaving.

Account deletion ends your access immediately, unlike regular cancellation which lets you finish your paid period.
Getting Refunds Within 30 Days
Surfshark offers full refunds if you request them within 30 days of purchase. After that window closes, you’re out of luck.
Live chat is your only refund option. Visit support.surfshark.com and click “Chat with us” at the bottom. Tell the bot you want a full refund and follow the guidance provided.
For subscriptions bought through Amazon or app stores, contact those platforms directly instead. Their standard refund policies override Surfshark’s terms. That means you might have fewer than 30 days depending on the store’s rules.
What to Try After Leaving Surfshark
Canceling your VPN doesn’t mean going without one. Privacy protection and access to geo-restricted content still matter.
Proton VPN delivers excellent performance at competitive prices. The service balances speed with strong privacy features effectively.
NordVPN provides a similar experience to Surfshark but with more stable apps. Fewer error messages and smoother operation make daily use less frustrating.
ExpressVPN costs more but works seamlessly across all platforms. If you’re willing to pay premium prices for reliability, it’s worth considering.
Choose based on what frustrated you about Surfshark. Better app stability? Fewer automatic feature activations? Different server locations? Match your priorities to what each alternative does best.
The VPN market is competitive. That means you’ve got plenty of solid options beyond Surfshark when you’re ready to switch.


Comments (0)