Local adjustments in Adobe Lightroom transform ordinary photos into compelling visual stories by allowing you to selectively brighten or darken specific areas of your images. Whether you’re enhancing portrait lighting, balancing landscape exposures, or creating dramatic effects, mastering these targeted editing techniques will revolutionize your post-processing workflow.
Understanding Local Adjustments vs Global Edits
While global adjustments affect your entire photograph uniformly, local adjustments provide surgical precision in your editing process. Think of it as the difference between painting an entire wall versus carefully highlighting architectural details—both have their place, but local adjustments give you creative control exactly where you need it.
Why Local Adjustments Matter for Professional Results
Professional photographers rely on selective exposure adjustments to:
- Draw viewer attention to key subjects
- Balance challenging lighting conditions
- Create depth and dimension in flat images
- Enhance mood and atmosphere
- Correct exposure problems in specific areas without affecting the entire photo
Essential Tools for Selective Brightening and Darkening
Adobe Lightroom offers multiple approaches to lighten or darken specific areas, each with unique strengths for different editing scenarios.
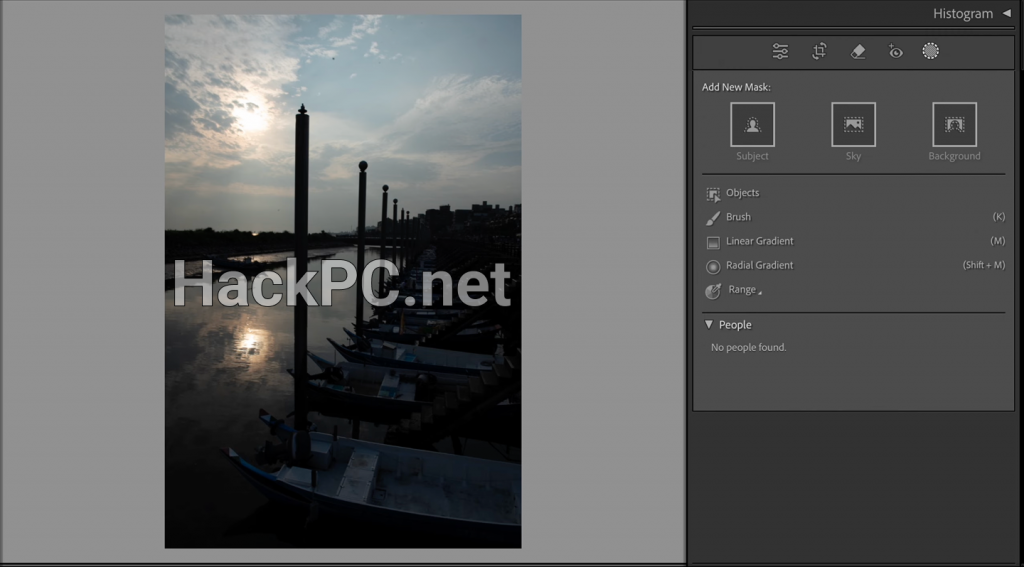
The Masking Panel: Your Central Command
Since Lightroom Classic 11.0 and Lightroom 5.0, all local adjustment tools live within the unified Masking panel. Access it through:
- Desktop: Click the Masking icon below the histogram (Shift+W)
- Mobile: Tap the Selective tool in the editing menu
- Lightroom Classic: Find it in the Develop module’s tool strip
AI-Powered Selection Tools for Instant Precision
Modern Lightroom leverages artificial intelligence to automatically detect and select complex areas, making targeted adjustments faster than ever.
Select Subject: One-Click Intelligence
The Select Subject tool uses machine learning to instantly identify and mask your main subject:
- Open your photo in the Develop module
- Click Masking > Select Subject
- Lightroom analyzes and creates an automatic selection
- Fine-tune using the Exposure slider to brighten or darken
- Adjust Shadows and Highlights for nuanced control
Pro Tip: After selecting your subject, use the Invert option to quickly adjust the background instead—perfect for creating separation or mood.
Select Sky: Transform Landscape Exposures
Landscape photographers frequently need to balance bright skies with darker foregrounds. The Select Sky tool automates this previously tedious process:
- Navigate to Masking > Select Sky
- Watch as Lightroom intelligently identifies sky regions
- Reduce Exposure to recover blown highlights
- Increase Vibrance for dramatic sunset colors
- Add graduated filter effects with the Dehaze slider
Select People: Portrait Perfection
For portrait retouching, the Select People tool offers unprecedented control:
- Choose Masking > Select People
- Lightroom detects all people in your frame
- Select specific individuals or body parts:
- Face and skin for exposure adjustments
- Eyes for brightening and clarity
- Hair for texture enhancement
- Clothing for color grading
Manual Selection Tools for Custom Control
When AI selections need refinement or you’re working with abstract compositions, manual tools provide complete creative freedom.
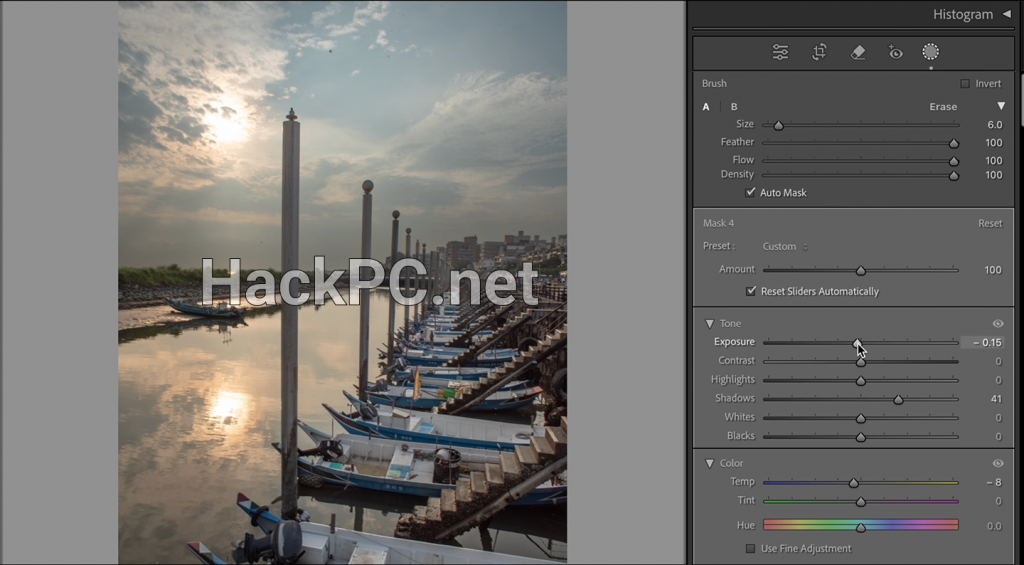
Brush Tool: Paint Your Adjustments
The Adjustment Brush remains the most versatile tool for irregular selections:
Essential Brush Settings:
- Size: Use brackets [ ] to quickly adjust
- Feather: Shift + brackets for edge softness
- Flow: Controls application speed (10-25% for subtle building)
- Density: Maximum effect strength (start at 50-70%)
- Auto Mask: Enables edge detection for precise boundaries
Technique for Natural Results:
- Start with low Flow settings (15-20%)
- Build up effects gradually with multiple strokes
- Use the Erase mode (hold Alt/Option) to refine edges
- Toggle overlay visibility (O key) to check your selection
Linear Gradient: Smooth Transitions
Perfect for horizons, architectural elements, or creating depth:
- Click and drag from the starting point to end point
- Adjust the gradient angle by rotating the center pin
- Modify transition smoothness with the feather handles
- Combine multiple gradients for complex effects
Creative Applications:
- Darken sky gradually toward the horizon
- Create light falloff in architectural interiors
- Simulate graduated neutral density filters
- Add atmospheric perspective to landscapes
Radial Filter: Spotlight Effects
The Radial Filter excels at creating vignettes, spotlights, and focus areas:
- Click and drag to create an elliptical selection
- Adjust size and shape using corner handles
- Control feather amount for natural blending
- Use Invert to affect inside or outside areas
Advanced Radial Techniques:
- Stack multiple radials for complex lighting
- Create off-center vignettes for rule-of-thirds compositions
- Simulate lens flares or light sources
- Isolate subjects with subtle darkening around them
Advanced Masking Techniques
Range Masking: Precision Through Parameters
Refine any mask using specific image characteristics:
Luminance Range Masking:
- Target specific brightness levels
- Perfect for separating highlights from shadows
- Adjust range and smoothness for natural transitions
Color Range Masking:
- Select based on specific color values
- Ideal for sky replacements or color-specific adjustments
- Use the eyedropper to sample target colors
Depth Range Masking (for compatible files):
- Utilize depth map information from portrait mode photos
- Separate foreground from background effortlessly
- Available for HEIC files with embedded depth data
Combining and Refining Masks
Modern Lightroom allows sophisticated mask combinations:
- Add: Expand your selection with additional tools
- Subtract: Remove areas from existing masks
- Intersect: Create selections where masks overlap
- Duplicate: Copy masks for similar adjustments
Professional Workflow for Selective Adjustments
Step 1: Global Corrections First
Always establish your baseline exposure before local adjustments:
- Set proper white balance
- Adjust overall exposure
- Correct lens distortions
- Apply profile corrections
Step 2: Plan Your Local Adjustments
Before creating masks, identify:
- Which areas need brightening or darkening
- The emotional impact you want to achieve
- Natural light direction in the scene
- Viewer’s visual journey through the image
Step 3: Build Adjustments Gradually
Start conservative and build intensity:
- Create initial mask with subtle adjustments
- Fine-tune selection boundaries
- Layer multiple masks for complex effects
- Use brush tool for final refinements
Step 4: Maintain Natural Appearance
Avoid these common pitfalls:
- Over-brightening eyes (uncanny valley effect)
- Creating obvious mask edges
- Ignoring natural light direction
- Excessive local contrast (HDR-like appearance)
Settings and Sliders for Exposure Control
Primary Exposure Controls
Exposure: ±5 stops of brightness adjustment
- Positive values: Brighten selected areas
- Negative values: Darken for drama or balance
Highlights: Recover blown highlights or add sparkle
- Negative values: Restore detail in bright areas
- Positive values: Enhance specular highlights
Shadows: Open up dark areas or deepen contrast
- Positive values: Reveal shadow detail
- Negative values: Increase dramatic contrast
Whites & Blacks: Fine-tune tonal endpoints
- Adjust carefully to avoid clipping
- Hold Alt/Option while dragging to see clipping preview
Secondary Enhancement Controls
Clarity: Midtone contrast for perceived sharpness Dehaze: Remove atmospheric haze or add mood Texture: Enhance fine details without harsh edges Vibrance: Intelligent saturation for natural colors Saturation: Global color intensity adjustment
Mobile Editing: Power in Your Pocket
Lightroom Mobile brings professional local adjustments to your smartphone:
- Tap the Selective tool
- Choose selection method (Subject, Sky, Brush)
- Adjust exposure with intuitive sliders
- Use pressure-sensitive editing on compatible devices
- Sync edits across all devices via Creative Cloud
Mobile-Specific Tips:
- Pinch to zoom for precise brush work
- Use Apple Pencil or stylus for accuracy
- Enable touch shortcuts for faster workflow
- Download originals for complex edits
Presets and Efficiency Tools
Creating Reusable Local Adjustment Presets
Save time with custom presets:
- Make your local adjustment
- Click the Effect dropdown
- Choose “Save Current Settings as New Preset”
- Name descriptively (e.g., “Portrait Eye Brightening”)
- Apply to similar photos instantly
Syncing Local Adjustments
Apply adjustments across multiple images:
- Use Auto-Sync for batch processing
- Copy/paste individual masks
- Adjust for different compositions
- Maintain consistency across photo series
Common Scenarios and Solutions
Portrait Brightening Workflow
- Select face using AI People mask
- Increase Exposure by +0.3 to +0.5
- Lift Shadows slightly (+10 to +20)
- Add subtle Clarity (+5 to +10)
- Brighten eyes separately with small brush
Landscape Sky Recovery
- Use Select Sky for automatic selection
- Decrease Exposure (-0.5 to -1.0)
- Increase Contrast (+20 to +30)
- Add Vibrance for color (+15 to +25)
- Apply graduated filter for smooth transition
Architectural Interior Balancing
- Create radial filter over windows
- Decrease Highlights (-80 to -100)
- Add linear gradient for floor/ceiling
- Use brush for specific shadow areas
- Maintain natural light direction
Troubleshooting Common Issues
Problem: Visible Mask Edges
Solution: Increase feather amount, reduce adjustment intensity, use Auto Mask carefully
Problem: Unnatural Looking Results
Solution: Reduce adjustment strength, check ambient light direction, blend multiple subtle masks
Problem: Slow Performance
Solution: Build Smart Previews, optimize catalog, work with lower resolution previews during editing
Best Practices for Professional Results
- Study Light: Understand how natural light behaves
- Reference Reality: Keep adjustments believable
- Work Non-Destructively: Lightroom preserves originals
- Document Settings: Note successful adjustment combinations
- Practice Restraint: Subtle adjustments often work best
- Consider Output: Adjust for intended viewing medium
- Maintain Consistency: Develop a signature style
Keyboard Shortcuts for Speed
- Shift+W: Open Masking panel
- K: Activate Brush tool
- Shift+M: Radial Filter
- M: Linear Gradient
- O: Toggle mask overlay
- Shift+O: Cycle overlay colors
- H: Hide/show pins
- Alt/Option: Switch to Erase mode
- [ ]: Adjust brush size
- Shift + [ ]: Adjust feather
Conclusion: Mastering the Art of Selective Adjustments
Lightening and darkening specific areas in Adobe Lightroom transforms good photographs into compelling visual narratives. By combining AI-powered selections with manual refinement tools, you gain unprecedented control over every pixel of your image.
Start with subtle adjustments, build your skills gradually, and always prioritize natural-looking results. Whether you’re enhancing portraits, balancing landscapes, or creating artistic effects, these local adjustment techniques form the foundation of professional photo editing.
Remember that mastery comes through practice—experiment with different tools, study how light naturally falls in scenes, and develop your unique editing style. The power to direct viewer attention, enhance mood, and perfect exposure lies within these selective adjustment tools, waiting to elevate your photography to professional standards.


Comments (0)