Taylor Swift dropped The Life of a Showgirl on October 3rd. Millions streamed it instantly on Spotify.
But most people miss Spotify’s audio tools that completely change how music sounds. These settings take 30 seconds to adjust. Yet they can make Swift’s vocals pop or flatten them into mush.
Here’s what you need to know before your next listen.
Base Volume Changes Everything
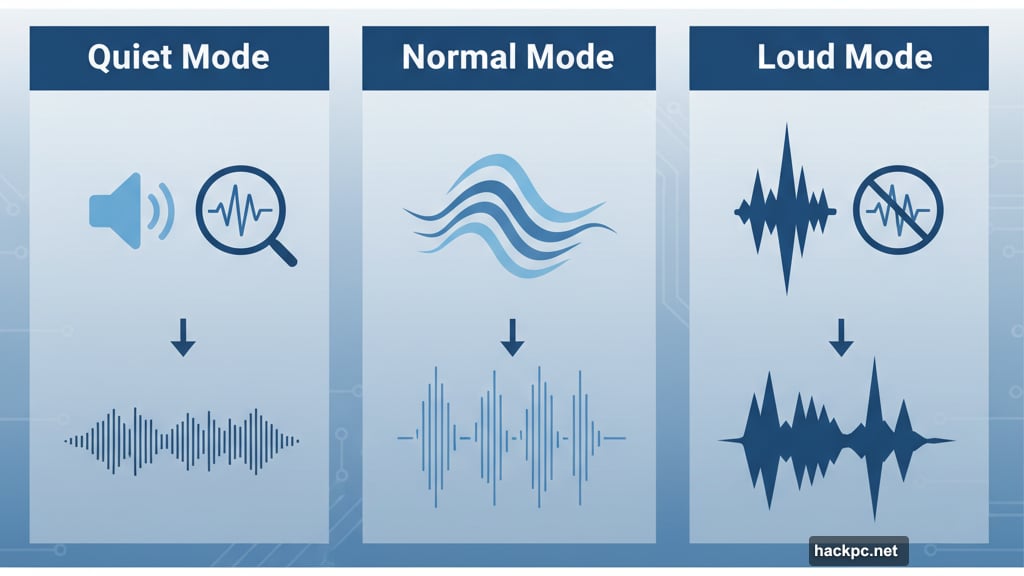
Spotify offers three base volume options. Most people never touch them. That’s a mistake.
Quiet mode reduces volume and sharpens sound quality. Perfect for late-night listening or studying. You’ll catch subtle details in the mix that normally get lost.
Normal mode sits in the middle. Decent for most situations. But it’s also the most generic option.
Loud mode cranks things up but sacrifices audio clarity. Great for the gym or noisy commutes. However, you’ll lose some of Swift’s vocal nuances at this setting.
Think of it like this. Quiet mode is for appreciating the production. Loud mode is for drowning out your surroundings. Choose based on your environment, not just your mood.
Finding the Volume Setting Takes Seconds
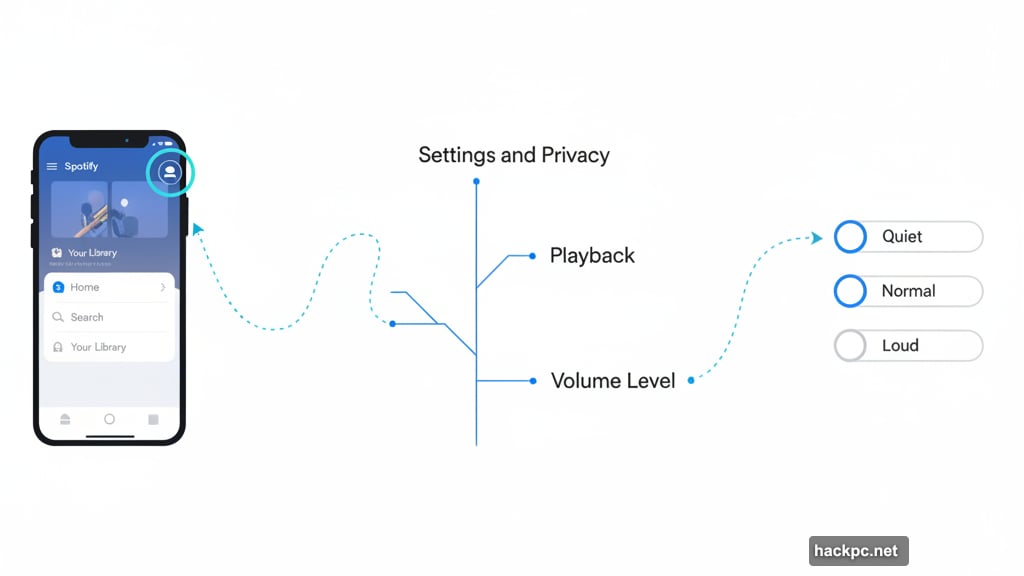
On iPhone, tap your profile picture. Then hit Settings and Privacy. Scroll to Playback. You’ll see Volume Level with three options.
Android users tap the gear icon. Navigate to Playback. Same three choices appear there.
Desktop users click their profile picture. Select Settings. Under Audio Quality, find Volume Level in the dropdown menu.
Mac users follow the same path. Windows users do too. The setting exists across every platform.
The Equalizer Unlocks Real Control
Volume level matters. But the equalizer gives you surgical precision over sound.
Bass controls low frequencies. Crank it up for thumping beats. Drop it down for cleaner vocals. Treble handles high frequencies. More treble makes cymbals shimmer and vocals cut through. Less treble softens harsh sounds.
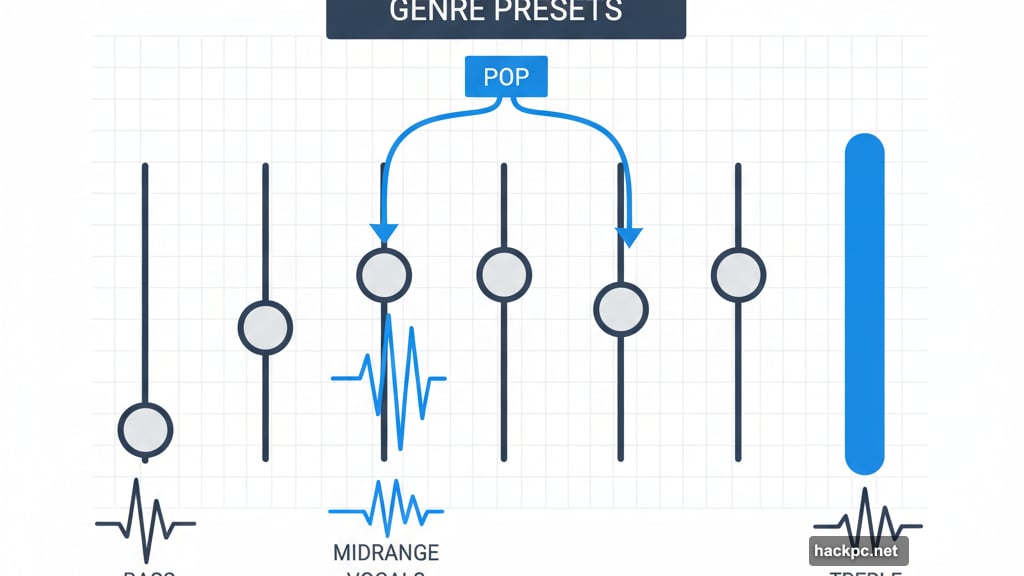
The six-dot slider graph shows you exactly what you’re adjusting. Far left controls bass. Far right handles treble. Middle dots manage midrange frequencies where most vocals live.
Plus, Spotify offers genre presets. Tap “Pop” and the app optimizes for Taylor Swift automatically. But you can still tweak from there.
Accessing the Equalizer Varies by Device
iPhone users tap their profile picture. Go to Settings and Privacy. Select Playback. Scroll down to find Equalizer.
Android users tap the gear icon. Navigate to Audio Quality. Tap Equalizer right there.
Desktop users click their profile picture. Hit Settings. Under Playback, toggle the Equalizer switch on.
But here’s the catch. Mac app users can’t access Spotify’s built-in equalizer. You’ll need a third-party equalizer application instead. Annoying but true.
Genre Presets Save Time
Don’t want to manually adjust six sliders? Genre presets do the work for you.
Spotify analyzes each music style. Then it adjusts bass, treble, and midrange accordingly. Pop music gets different treatment than rock or hip-hop.
Select your genre. The sliders move automatically. Then fine-tune from there if needed. Or just trust Spotify’s algorithms.
Want to reset everything? Choose the “Flat” preset. This returns all sliders to neutral positions.
Audio Quality Drains Data Fast
Higher quality means clearer sound. It also means more data usage. That matters if you’re not on unlimited plans.
Spotify offers five quality tiers. Automatic adjusts based on your connection. Low uses minimal data. Normal balances quality and bandwidth. High prioritizes sound over data savings.
Premium subscribers get a fifth option. Very High quality delivers studio-grade audio. But it gobbles data like crazy.
Changing Quality Settings Per Connection
You can set different quality levels for WiFi versus cellular. Smart move for data management.
Mobile users tap their profile picture. Navigate to Media Quality. You’ll see separate options for WiFi Streaming and Cellular Streaming.
Desktop users click their profile picture. Select Settings. Under Audio Quality, find Streaming Quality in the dropdown.
Set WiFi to Very High if you’re premium. Drop Cellular to Normal or Low to protect your data cap. That way you get great sound at home without destroying your monthly allowance.
Why Most People Never Touch These
Spotify hides these settings pretty well. They’re not front and center. You have to actively hunt for them.
Plus, default settings work fine for casual listening. Most people don’t notice the difference until someone points it out. Then suddenly they can’t unhear it.
But once you optimize these settings, going back feels wrong. You’ll notice muddy bass or harsh treble that you previously ignored. That’s both a blessing and a curse.
The Real Issue Nobody Mentions
Spotify designed these tools for audiophiles. But they buried them in menus where regular users never look. Why?
My guess? Too many options overwhelm most people. Spotify wants a simple, plug-and-play experience. Advanced features exist for power users who seek them out.
That makes business sense. But it means millions of subscribers are listening to subpar audio quality without realizing it.
Take five minutes to explore these settings. Your favorite albums deserve better than default configurations. Taylor Swift’s producers spent months perfecting The Life of a Showgirl’s mix. The least you can do is optimize your playback settings.


Comments (0)