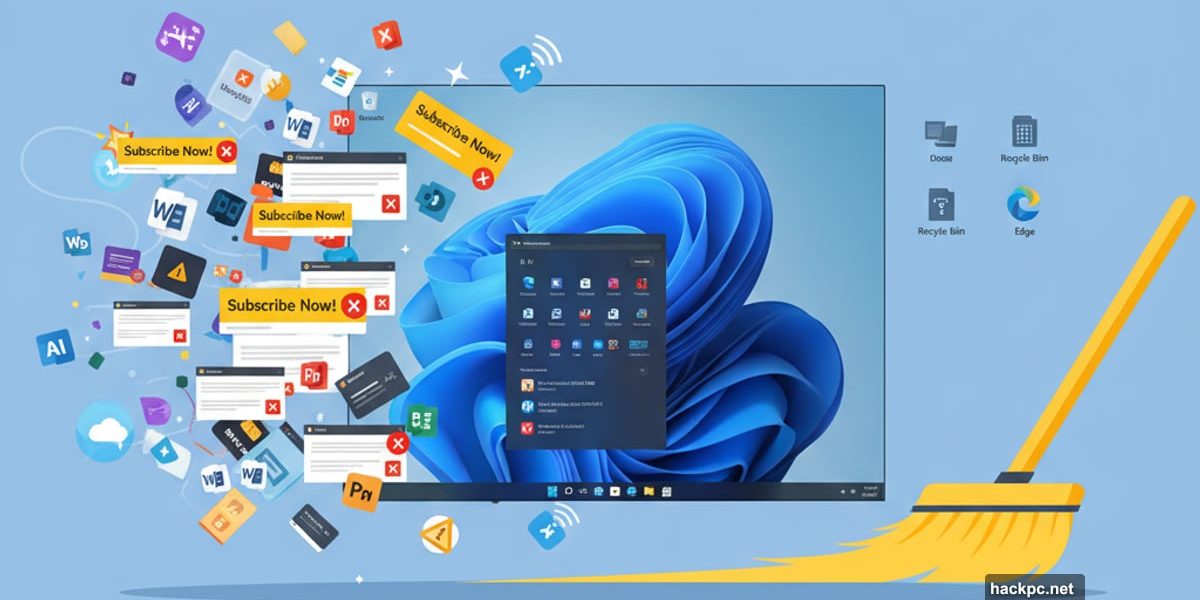
Windows 11’s latest update arrived quietly. But the clutter problem? That got worse.
Microsoft’s 25H2 update barely changes Windows under the hood. Yet somehow the operating system keeps accumulating more ads, subscriptions, and AI features nobody asked for. So if you’re finally upgrading from Windows 10 or setting up a fresh install, you’ll need to spend serious time cleaning up.
This guide walks through every toggle, setting, and removal step to make Windows 11 actually usable. No experimental hacks. Just the official ways to strip out Microsoft’s aggressive upsells and regain control of your desktop.
Skip the Microsoft Account During Setup
Windows 11 forces Microsoft account sign-in during setup. But you can avoid it.
Why bother? Two reasons. First, signing in triggers endless subscription pitches for Microsoft 365, OneDrive, and Game Pass. Second, your user folder gets named after your email address instead of something sensible like “C:\Users\Andrew.”
Three workarounds exist. Pick whichever fits your comfort level.
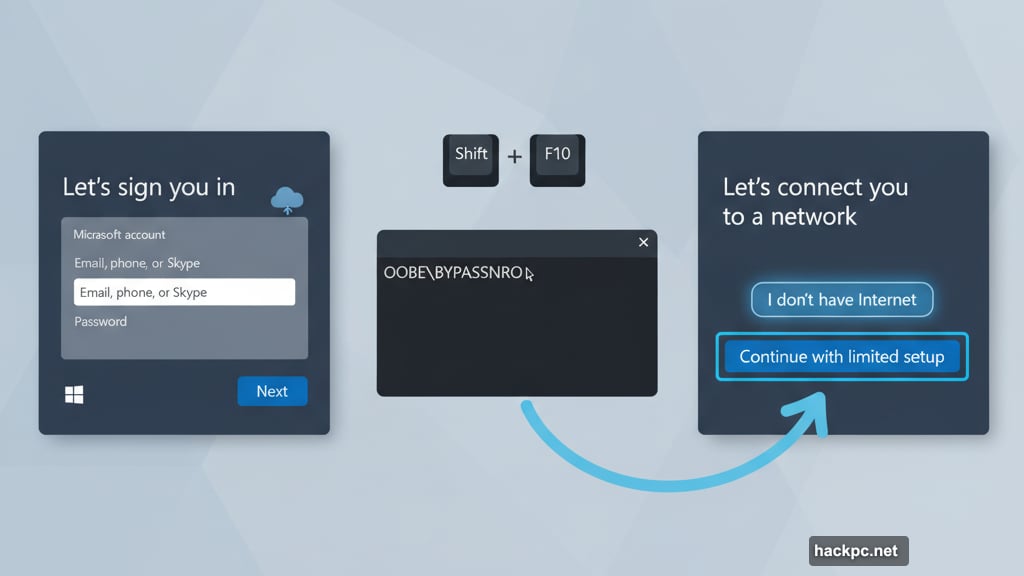
Command Line Method
During setup, hit Shift+F10 after selecting language and keyboard. Type OOBE\BYPASSNRO in the command prompt and press Enter. The PC reboots. When it restarts, click “I don’t have Internet” and you’ll see the local account option.
This trick still works in 25H2. But Microsoft keeps removing it from test builds. So expect it to vanish eventually.
Windows 11 Pro Workaround
Pro users get an easier path. Connect to the network during setup. When asked whether you’re setting up for personal or work use, select “work or school.” Then click “sign-in options” followed by “domain join instead.”
Yes, you’re lying to Windows about joining a corporate domain. But Microsoft forced this situation with its hostile account requirements.
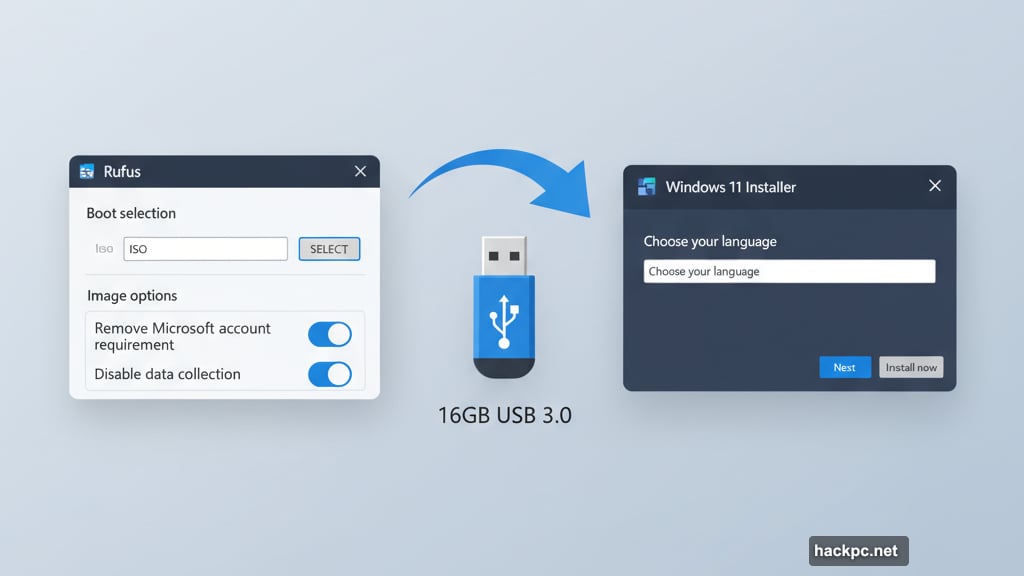
Use the Rufus Tool
Rufus creates bootable USB drives and can strip Microsoft account requirements from Windows install media entirely. Download Rufus and a Windows 11 ISO from Microsoft. Grab a 16GB USB drive with USB 3.0 support.
Launch Rufus, select your drive and ISO, then hit Start. You’ll see options to disable account requirements and turn off data collection. Enable what you want. The modified installer boots on any PC without forcing sign-in.
Plus, having a tweaked USB drive saves time on future installs.
Windows 11 OOBE: Skip Bloatware Installation
The rest of setup mostly involves declining offers. Turn every toggle on the privacy settings screen to “no.” This covers location services, Find My Device, and four separate data collection options.
Use Tab and spacebar to toggle these quickly without clicking. Much faster than scrolling through each one individually.
Sign in with a Microsoft account? Expect extra screens pushing Microsoft 365, OneDrive, and Xbox Game Pass subscriptions. Decline them all unless you actually want those services.
Uninstall Pre-installed Windows 11 Apps
A fresh Windows 11 desktop greets you with chaos. The Start menu overflows with apps you’ll never use. Third-party app shortcuts sometimes appear automatically when you connect to the internet.
Right-click each unwanted app in the Start menu and uninstall. Some are just stubs that won’t fully install until you launch them. So removing them from Start deletes them entirely.
First-party apps you can remove include Xbox, Outlook, Clipchamp, LinkedIn, and the ad-filled Solitaire collection. Open Settings > Apps > Installed apps to see everything that’s removable.
Here’s the complete list of removable apps in Windows 11 25H2:
Calculator, Camera, Clock, Copilot, Family, Feedback Hub, Game Assist, Media Player, Microsoft 365 Copilot, Clipchamp, OneDrive, Teams, To Do, News, Notepad, Outlook, Paint, Photos, Power Automate, Quick Assist, Remote Desktop Connection, Snipping Tool, Solitaire & Casual Games, Sound Recorder, Sticky Notes, Terminal, Weather, Web Media Extensions, Xbox, Xbox Live.
Microsoft Edge and the Store can’t be removed. Everything else is fair game. Remove what you don’t use and ignore the rest.
Customize Windows 11 Taskbar and Widgets
Microsoft abhors empty screen space. So the taskbar and Start menu overflow with recommendations, widgets, and search clutter.
Right-click the desktop, select Personalize, and switch to any built-in theme. This disables Windows Spotlight wallpapers and removes the “Learn about this picture” icon.
Right-click the taskbar and open settings. Disable the Widgets board entirely unless you want the weather icon. If you keep Widgets enabled, open the menu, click Settings, scroll to feeds, and turn them off. This keeps weather and stocks but removes spammy news articles.
Change the Search setting from “search box” to “search icon only.” This frees up taskbar space without losing search functionality.
Open Settings > Privacy & Security > Recommendations & offers. Disable “Personalized offers,” “Improve Start and search results,” “Show notifications in Settings,” “Recommendations and offers in Settings,” and “Advertising ID.”
Navigate to Settings > Privacy & Security > Diagnostics & feedback. Scroll down and set “Feedback frequency” to “Never.”
In Settings > Privacy & Security > Search, disable “Show search highlights.” Search becomes much cleaner and focuses on local apps instead of Microsoft’s recommended content.
Disable Windows 11 Lock Screen Ads and Tips
Windows 11 turns your lock screen into advertising space. Fix that.
Open Settings > Personalization > Lock screen. Switch from “Windows spotlight” to Picture or Slideshow to use local images. Then uncheck “get fun facts, tips, tricks, and more.” This removes clickable elements and text boxes Microsoft adds automatically.
Under “Lock screen status,” select “none” to hide weather widgets and news feeds from your lock screen entirely.
Newer PCs with dedicated Copilot keys can remap them in Settings > Personalization > Text input. But options are limited. You can switch to Search or Microsoft 365, but not arbitrary apps. Microsoft hasn’t opened this up yet.
Turn Off Start Menu Recommendations
The Start menu occasionally suggests Microsoft Store apps you haven’t installed. Stop that behavior immediately.
Open Settings > Personalization > Start. Turn off “Show recommendations for tips, shortcuts, new apps, and more.” This prevents random app suggestions from appearing in your recommendations alongside actual files.
Also disable “show account-related notifications” to reduce Microsoft account upsell prompts.
Head to Settings > System > Notifications. Scroll down and expand additional settings. Uncheck all three boxes to eliminate “finish setting up your PC” reminders.
Disable Windows Copilot AI and Suggestions
Microsoft steadily adds AI image and text generation to core Windows apps. Paint, Photos, and Notepad all gained AI capabilities recently.
Unfortunately, you can’t disable these features without uninstalling entire apps. Apps like Notepad and Edge have toggles for Copilot. But Paint doesn’t offer any way to hide AI features.
Even if you find Registry hacks to disable AI tools, updates will likely re-enable them. Easier to just ignore features you don’t use rather than fight constant updates.
Remove Recall on Copilot+ PCs
Copilot+ PCs with Snapdragon X, recent Intel Core Ultra, or AMD Ryzen AI chips get extra AI features. Most notably, they include Recall.
Recall won’t activate unless you sign in with a Microsoft account and explicitly opt in. But you can fully remove it for peace of mind.
Verify Recall’s status in Settings > Privacy & security > Recall & snapshots. This shows whether it’s enabled and lets you adjust settings.
To completely remove Recall, open Settings > System > Optional Features. Scroll down and click “More Windows features.” This opens the legacy Control Panel applet for managing Windows components. Find Recall in the alphabetical list and uncheck it.
In Settings > Privacy & security > Click to Do, disable Click to Do. This Copilot+ feature takes screenshots of your desktop and suggests actions.
Apps may prompt you to install a gigabyte-plus AI image generation extension from the Microsoft Store. This isn’t installed by default. If you added it, remove it through Settings > Apps > Installed apps by deleting “ImageCreationHostApp.”

Clean Up Microsoft Edge
Edge remains the only Microsoft browser option in Windows 11. It’s based on Chromium, so it’s fast and compatible. But Microsoft stuffed it with services and AI features that bog down the experience.
New Edge installations assume nobody would ever want different search engines or fewer Microsoft services. Settings for changing search engines don’t sync between devices. So you’ll reconfigure everything on each new install.
Here’s what to change for a cleaner Edge experience.
On the Start page, click the Settings gear. Turn off “Quick links” or at least disable “Show sponsored links.” Turn off “show content.” Keep the background and weather widget if you want them.
Click “your privacy choices” at the bottom and disable “share my data with third parties for personalized ads.”
In the Edge menu (three dots near the upper-right), open Settings. Click Profiles, then Microsoft Rewards, and turn it off.
Under Privacy, Search, & Services, set tracking prevention to “strict.” Then disable toggles under “Optional diagnostic data,” “Help improve Microsoft products,” and “Allow Microsoft to save your browsing activity.”
In Search and connected experiences, turn off “Suggest similar sites when a website can’t be found,” “Save time and money with Shopping in Microsoft Edge,” and “Organize your tabs.”
Want to switch from Bing? Click “Address bar and search” and select Google, DuckDuckGo, or your preferred engine. Then click “Search suggestions and filters” and disable “Show me search and site suggestions using my typed characters.”
Click Appearance in Settings. Scroll to Copilot and sidebar. Turn the sidebar off. Disable “Personalize my top sites in customize sidebar” and “Allow sidebar apps to show notifications.”
Click Copilot under App specific settings. Turn off “Show Copilot button on the toolbar.” Back in Copilot and sidebar settings, turn off the “Show sidebar button” toggle that appears.
Click Languages. Disable “Use Copilot for writing on the web.” Turn off “use text prediction” to prevent typed content from going to Microsoft. Switch the spellchecker from Microsoft Editor to Basic if you want to minimize data sharing.
Clean Windows 11 Install vs Debloating Tools
Installing Windows XP or Windows 7 meant reinstalling apps afterward. Browser, Office, Adobe Reader, Photoshop, VLC player. That was the time-consuming part.
Windows 11 still requires reinstalling apps. But now you also spend significant time disabling built-in features and advertisements. That’s more relevant as Windows 10 support ends and holdouts finally upgrade.
These settings won’t fix everything. But they’ll reduce interruptions and let you use your PC without constant Microsoft interference. Ideally, Microsoft would ship respectful defaults. Until that happens, manual cleanup remains necessary.
Choose what matters to you. Remove apps you’ll never use. Turn off recommendations and ads. Switch search engines and disable AI features you don’t want. Then move on with your work.
Your PC should serve you, not Microsoft’s revenue targets.
Post Title: Windows 11 Cleanup Guide: Remove Ads, AI, and Bloatware
Meta Description: [Windows](https://www.microsoft.com/windows) 11’s latest update arrived quietly. But the clutter problem? That got worse.


Comments (0)