Building a website sounds intimidating. But it doesn’t have to be.
Wix lets you create professional sites without touching a line of code. However, there’s still plenty to learn before you dive in. From picking the right domain to designing your first blog post, each step matters.
Let’s walk through exactly how to build a Wix website that looks great and actually works.
Pick Your Domain First
Your domain is your website’s address. Think cnet.com or yourname.com.
This matters more than you think. People use your domain to find you, remember you, and share your site with others. So choose wisely.
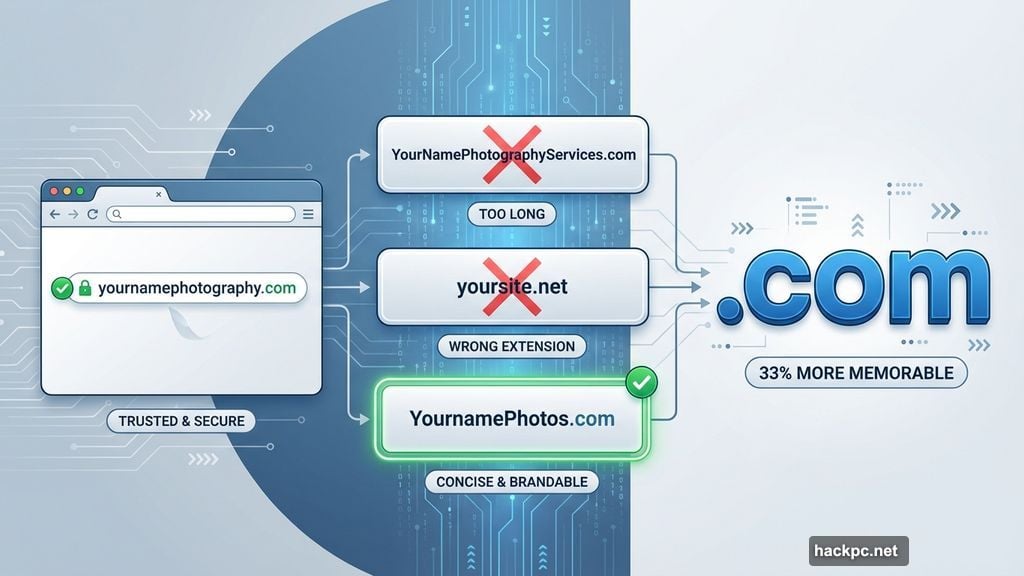
Keep it relevant. Your domain should connect to your site’s purpose. Running a photography business? Try “yournamephotography.com” or something similar. This helps people draw the connection between your name and what you do.
Keep it short. Shorter names stick in memory better. Aim for one or two words max. “YournamePhotos.com” beats “YourNamePhotographyServices.com” every time.
Keep it simple. Easy spelling means people type it correctly. Simple pronunciation means they can recommend you over the phone or in conversation. Both boost word-of-mouth growth.
Stick with .com domains. Research shows .com extensions are 33% more memorable than alternatives. Only break this rule if you’re targeting a specific country (like .ca for Canada) or running a nonprofit (.org domains).
You can brainstorm names yourself or use tools like DomainWheel for suggestions. Either way, run your top choices by trusted friends. Their gut reactions tell you a lot.
Plus, Wix includes a free domain for year one. But buying separately through a registrar often saves money long-term.
Choose Your Wix Plan
Wix forces you through a free trial before purchasing. That’s fine. But know which plan you want upfront.
Why? The trial lets you activate features restricted on certain plans. You’ll waste time building with tools you can’t keep after the trial ends.
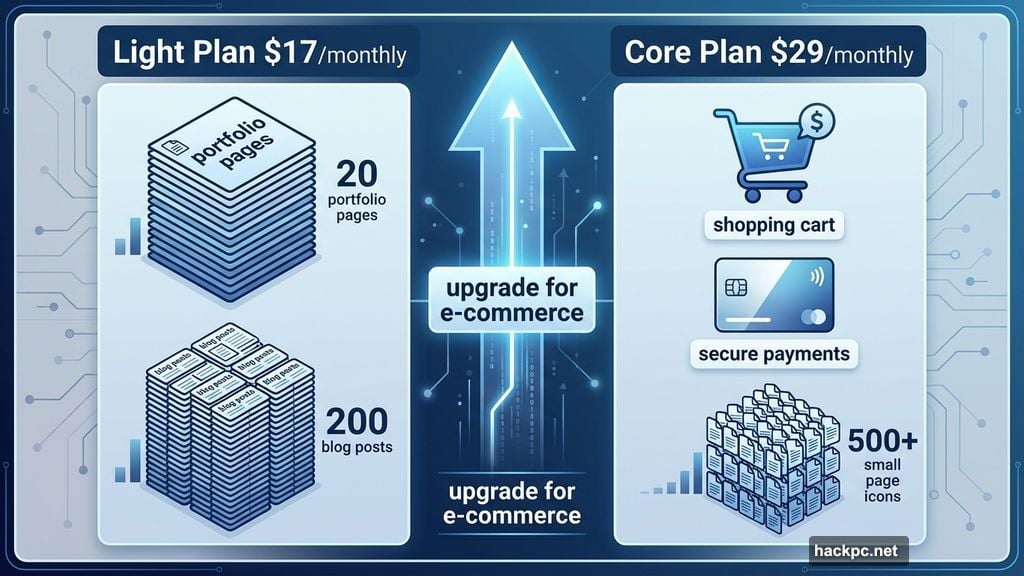
Start with Light for most sites. At $17 monthly, Light handles at least 20 large pages (think portfolio pages loaded with high-res images) or 200 smaller pages (like blog posts with minimal photos). This works great for professional portfolios, hobby sites, or infrequent blogs.
Upgrade to Core for selling stuff. This $29 monthly plan unlocks e-commerce features and stores 500+ pages. However, it only auto-calculates sales tax on 100 transactions monthly. That’s a dealbreaker for serious online stores. For e-commerce, Squarespace or Shopify work better.
Set Up Your Account
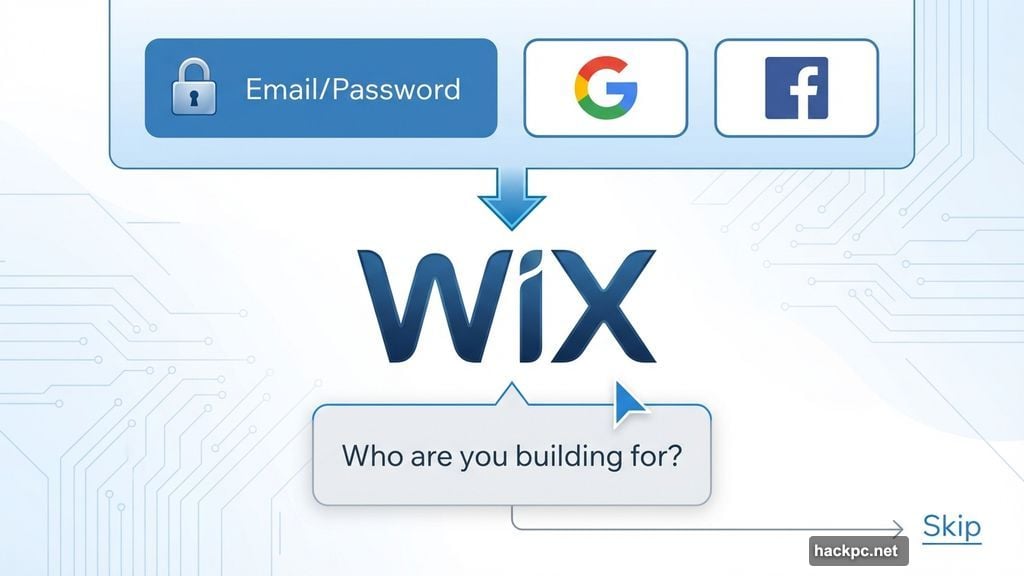
Creating your Wix account takes seconds. Use an email and password, or sign in through Google or Facebook.
Fair warning: Single sign-on (SSO) through social platforms isn’t always secure. Email/password gives you more control.
After signup, Wix asks who you’re building for. You can skip this entirely using the link in the bottom right corner.
Next comes the AI chat generator. Wix gathers info about your site to create a design automatically. Sounds great. Reality? The AI often creates ugly websites. Skip this step.
Skipping takes you to Wix’s regular setup. Here you enter basic details: site name, purpose, and goals.
Wix uses this info to suggest apps. Anything you check gets added automatically. But here’s the catch—some apps only work on higher-tier plans. Cross-reference suggestions with the Wix plans page to avoid installing tools you can’t actually use long-term.
Wix also creates a custom setup checklist based on your inputs. Helpful if this is your first website build.
Connect Your Domain
Next, link your domain to Wix. If you bought through Wix, use the “Connect a Custom Domain” checklist item to verify availability.
Bought from a registrar like Namecheap? Log into your registrar account. Point your domain to Wix nameservers in the DNS management area. Takes about five minutes.
One catch: You need a paid Wix plan to connect your domain. If you want to test Wix’s software first, skip this step. Connect later after building your site.
Pick Your Template Carefully
Your template is your design foundation. Choose wrong and you’ll waste hours fixing it later. Wix makes switching templates painful, so get this right upfront.
Wix offers 800+ templates. That’s overwhelming. But there are shortcuts.
If you told Wix what your site is about, it auto-fills search keywords and shows relevant templates. You can also manually enter keywords or use dropdown filters for type (blog, e-commerce), industry (photography, fashion), or collections (new, popular).
All templates let you customize colors, fonts, and content placement. But start close to your final vision. This minimizes work before launch.
For blogs, try the Travel Blog template. Clean layout, easy navigation, built for content.
For portfolios, the Interior Design Portfolio template works great. Showcases visuals beautifully without overwhelming visitors.
Pro tip: Toggle between desktop and mobile views in the Wix previewer. See how your template adapts to smaller screens before committing.
Customize Your Design
Open the editor and select Site Design. This controls your site’s color scheme, fonts, and background across all pages.
Remember these design principles:
Simplicity wins. Your design should look good but keep focus on your content. Skip background images. Stick with two primary colors and two accent colors. Use no more than two fonts—bold for headers, regular for paragraphs.
Contrast matters. Significant contrast between background and text makes reading easier. That’s why most sites use white backgrounds with black text. You can reverse this (white text on black) or use other high-contrast combos. Just make sure text pops.
Bigger text reads better. Set paragraph text to at least 13-point font. Size up headers so they visually stand apart. Visitors can adjust text size in their browser, but starting readable helps everyone.
Build Your Homepage Right
Your homepage is crucial. It needs to grab attention, guide navigation, and push action.
Include these elements:
High-quality visuals. Photos, graphics from Canva, or custom illustrations catch and hold attention. Make sure images complement your color scheme.
Bold headers. Large, high-contrast headers communicate fast. Your top header should explain how your site helps visitors in one clear sentence.
Calls to action. Buttons or links telling visitors what to do next. “Subscribe to our newsletter” or “View our services” work great. Put at least one near the top. Add more in each section.
White space. Blank space between text and images makes content easier to absorb. It also prevents cluttered, overwhelming layouts.
Clean navigation. Your menu should include a small number of important links with clear labels. Use layered menus (with dropdowns) if you have many pages. Add smaller links in your footer for secondary pages.
Visit competitor sites for inspiration. Note their layouts and visuals. Figure out what works for your niche and how to stand out.
Optimize for Mobile
Responsive design auto-adjusts your site for different screens. Most builders handle this automatically, saving time but limiting control.
Wix gives you near-complete mobile customization through its mobile site editor.
Start by customizing how your header behaves as mobile users scroll. Then control where quick actions (like email or social sharing) appear. Activate a Return to Top button if you want.
The full mobile editor lets you view and modify your site’s phone appearance and functionality in detail.
Most templates adapt well to mobile automatically. But having this control helps when they don’t. Test thoroughly on actual phones to ensure everything works smoothly.
Add Essential Pages
Most websites need multiple pages to succeed. Specifically:
About page. Tell your story. Explain why you created your site and what you aim to accomplish. Make it personal and genuine.
Contact page. Let visitors reach you via contact form. Consider adding your email address, business phone, hours, or average response times.
Newsletter page. Dedicate space to building your email list. Emphasize your signup form and mention any freebies or discounts subscribers get.
Many Wix templates include these pages by default. Navigate to them by clicking your menu in the editor, selecting Navigate, then choosing the page you want to edit.
You might also want:
- Store/product pages for selling physical or digital products
- Services pages where people learn about and book your professional services
- Privacy policies explaining what visitor data you collect and how you use it
Adding new pages is simple. Click your menu and go to Manage Menu > Add Menu > New Page. Or click the page icon in the sidebar and select Add Menu Item > New Page. Choose from template pages or start with a blank canvas.
Test Everything
Your site looks great in the editor. That doesn’t mean it works great for users.
Run two types of tests:
Self-testing. Explore your site yourself in multiple browsers and on multiple devices. Click around pages. Make sure links and images load properly and quickly. Note anything that feels clunky or confusing.
Third-party testing. Ask a friend, colleague, or audience member to explore your site. Give them specific things to watch for: navigation intuitiveness, broken links, missing images. Their fresh perspective catches issues you’ll miss.
Do at least one round of each test type. Fix problems before launch. Your visitors will thank you.
Launch Your First Blog Post
If your site includes a blog, publish something before going live. This gives visitors immediate value and establishes what your blog offers.
Two approaches work:
News-style post. Explain your website’s purpose, your brand, and your existing products or services. Share launch promotions like early bird discounts. This works if your blog mainly shares company updates.
Educational post. Write an article establishing your expertise and helping readers solve a problem. This works if your blog will be a major resource or significant portion of your site.
Either way, set expectations. Show visitors what they’ll get from following your blog, subscribing to your newsletter, or buying from you.
Add blog posts from the main Wix dashboard. Select Blog > Posts in the sidebar. Click Create New Post. Then write using blogging best practices: organize with headers, use short sentences, keep readers engaged.
Prepare for Launch Day
Resist the urge to launch immediately after finishing your site. Take time to get your launch right.
Give yourself at least 30 days between starting your build and going live. Use those weeks to perfect your site and build excitement on social media. Share bits and pieces of what you’re working on.
This won’t guarantee massive traffic on day one. Most sites take months or years to gain serious traction. But it helps you start on the right foot and build momentum from the beginning.
Choose your launch timing strategically. Prepare your promotional materials. Then hit publish with confidence.


Comments (0)