If you’ve played around with Autodesk Flow Studio’s Wonder 3D tools at all, you probably noticed pretty quickly that the default settings work surprisingly well. But there’s a lot more hiding underneath those defaults — and once you start poking around, things get genuinely interesting.
I spent time exploring every parameter these tools offer, from simple text-to-image tweaks to the more technical 3D rendering options. Here’s what I found.
Getting Into Flow Studio Without Spending a Dime
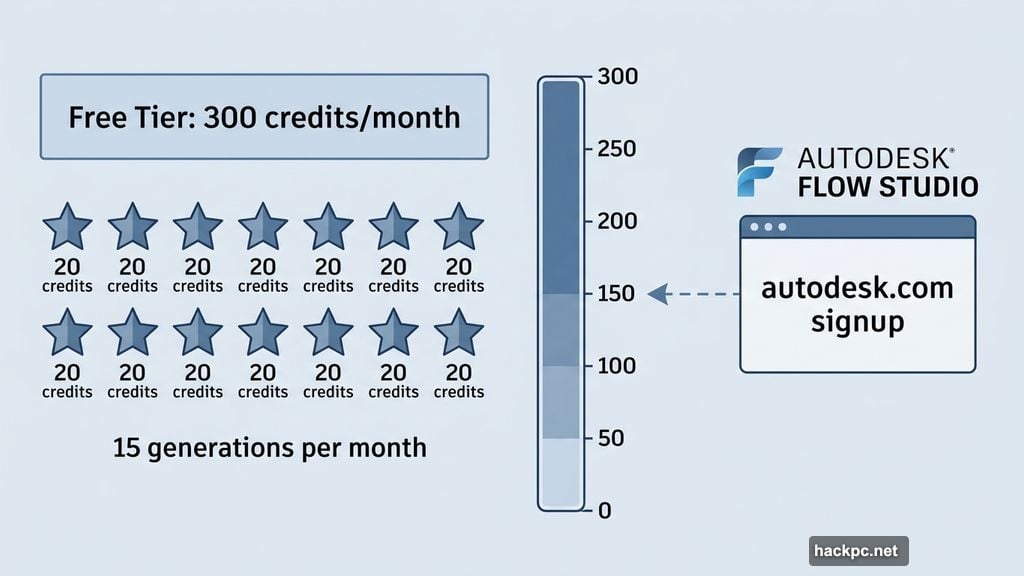
First, the good news. Flow Studio offers a free tier that gives you real access to these Wonder 3D tools — not just a demo. You get 300 credits each month, and since each AI generation costs 20 credits, that works out to 15 creations per month.
That’s not a huge amount. But it’s enough to genuinely explore how everything works before deciding whether to pay for more. You can sign up and start experimenting right at Autodesk’s website.
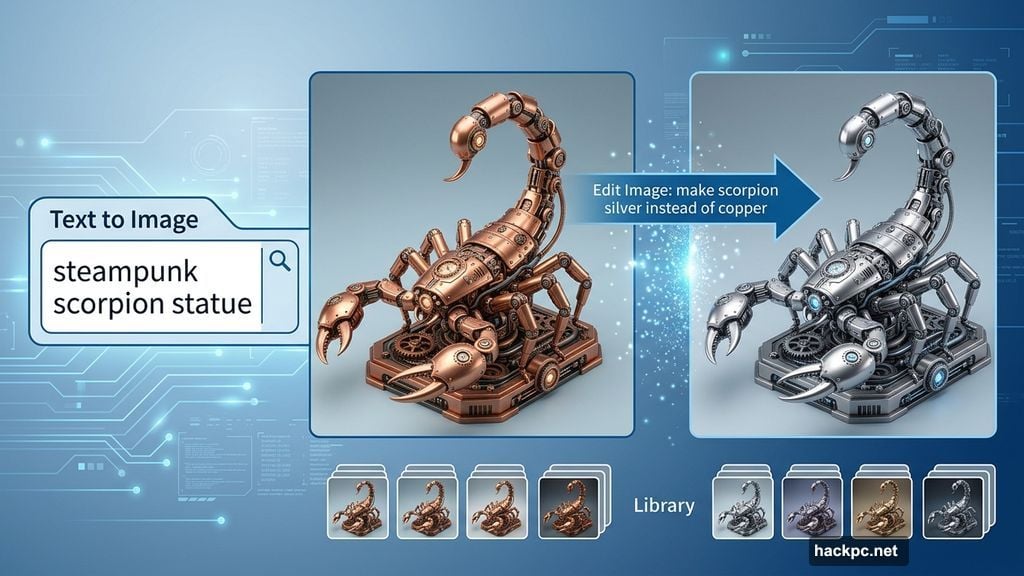
Text to Image Goes Deeper Than a Simple Prompt
The Text to Image tool is the most straightforward entry point. Type a description, spend 20 credits, and Wonder 3D generates your image. Simple enough.
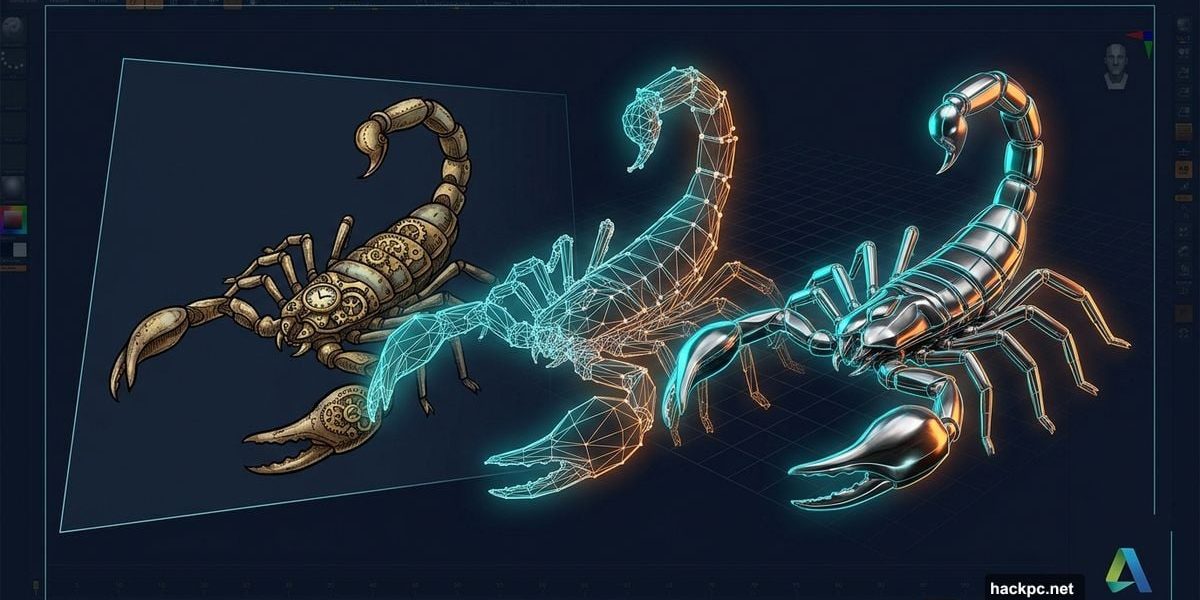
But here’s where it gets clever. Say you generate something you mostly like — a steampunk scorpion statue, for example — but want to tweak one detail. Instead of typing a whole new prompt and hoping for the best, there’s an “Edit Image” button sitting right beneath your result.
Click it, and the sidebar switches from “Create Image” to “Edit Image.” Now you can type a targeted instruction, like “make the scorpion silver instead of copper.” The result won’t be pixel-for-pixel identical to the original — the zoom level shifted slightly in my test — but the overall composition, angle, and background stayed consistent. Just with a silver finish instead of copper.

Every request costs 20 credits, whether it satisfies you or not. The upside? Every single variant gets saved to your Library automatically. So you can revisit any version anytime, which is genuinely handy when you’re iterating through ideas.
I had fun experimenting with materials. Wood worked great. Crystal and stone gave the algorithm some trouble. That’s just the nature of generative AI — it’s impressive, but not perfect.
Image to 3D Mesh Generation Is Where Things Get Exciting
Here’s a workflow trick that really impressed me. Let’s say you need a 3D model of something that doesn’t exist in the real world — my wooden scorpion statue, for instance. You can’t photograph it. But Wonder 3D already made you an image of it.
From the Text to Image view, just select that image in your Library and hit “Use as 3D Input.” The interface looks almost identical, but the sidebar quietly switches over to the Image to 3D section, with your image already loaded as the prompt. No downloading, no re-uploading. It’s a smooth handoff.
Then you name your creation (unlike the image section, this doesn’t happen automatically — don’t forget this step), click “Generate Mesh,” and wait a few minutes. The algorithm produces four variants to choose from.
If you’re using Text to 3D instead, the four variants look visibly different from each other since they’re interpreting a text description. With Image to 3D, the differences are more subtle — primarily in the number of faces and vertices used to build the mesh.
One practical note: the free tier processes one generation at a time. Paid tiers run multiple simultaneously — 5 on Lite, 10 on Standard, 15 on Pro, 20 on Enterprise. Patience works fine if you’re on free, though.
Polycount, Topology, and What Those Options Actually Mean
Once you pick one of your four mesh variants, you hit a more technical set of choices. This is the stage where texture gets applied and the model fully renders. But there are parameters worth understanding before you just click through.
The first is Polycount Model, with three options: Fixed, Adaptive, and Max.
Fixed gives every part of your model the same level of detail, regardless of how complex that area is. A smooth flat surface and a intricate curved shape both get the same polygon count. This works well for simple objects and is a solid choice for game assets.
Adaptive is smarter. It distributes polygons based on local complexity — more detail where geometry gets complicated, fewer where things stay smooth. This produces more realistic results for detailed models.
Max is essentially Adaptive with guardrails. It caps how many times any polygon can be subdivided, which prevents runaway detail generation from overwhelming your system. Without that cap, an ambitious Adaptive render could theoretically keep subdividing indefinitely, crashing everything.
Then there’s Topology, with two choices: Triangles or Quads.
Quads — four-sided polygons — are the better choice when your model needs to be animated or involves organic shapes. Animators prefer quads because they deform more predictably.
Triangles suit rigid objects like furniture, weapons, or architectural elements. They’re also standard for real-time game engines.
You can preview all of this interactively. Click any model thumbnail and it appears center-screen, fully rotatable with your mouse or trackpad. You can spin it in any direction, view it from below, zoom right in. This is where the polygon count differences become obvious — I dropped mine from 30,000 polygons to 3,000, and the model developed visible holes it simply couldn’t render at that low a count.
Retexture Lets You Swap the Model’s Skin
Beyond the mesh settings, there’s a Retexture option that lets you strip your model’s existing texture and apply a new one. You can do this either by feeding it an image or using a text prompt.
The image-based retexturing worked well when I used another version of my scorpion with a different finish — metal instead of wood applied cleanly. But the algorithm rejected some images entirely. Grass and water textures both failed for me, and honestly I’m not sure why some work and others don’t.
The text-based “Text to Texture” option is more forgiving. Asking for a grass scorpion got me a green one instead. Asking for water got some blue tones scattered across the surface. Not exactly literal, but interesting in its own way.
The Rig Feature Is Coming, But Not Here Yet
If you’re wondering whether you can add an articulated skeleton to your model for animation purposes — technically yes, that’s called rigging, and there’s a button for it in the lower right of the preview area. But as of now, clicking it does nothing. That feature isn’t ready yet.
Same goes for the List View option in your Library. The button exists, but the feature hasn’t launched.

Worth knowing before you spend time hunting for it.
Fast, Flexible, and Worth Exploring
What genuinely surprised me throughout all of this is the speed. Images generate in seconds. Complex 3D meshes take around two to three minutes. That’s fast enough to experiment freely without the process feeling like a slog.
Some features don’t work yet, and the AI doesn’t always nail every material or texture you throw at it. But even with those limitations, the ability to go from a text description to a rotatable, textured 3D model in a few minutes — all inside a browser tab — is something worth paying attention to.
Whether you’re a designer looking to prototype ideas quickly, or just someone curious about generative 3D tools, the free tier gives you enough room to find out if this fits your workflow. Next up, I’ll be testing whether it’s possible to build a complete, export-ready model using only those 300 free monthly credits — so stay tuned for that.


Comments (0)